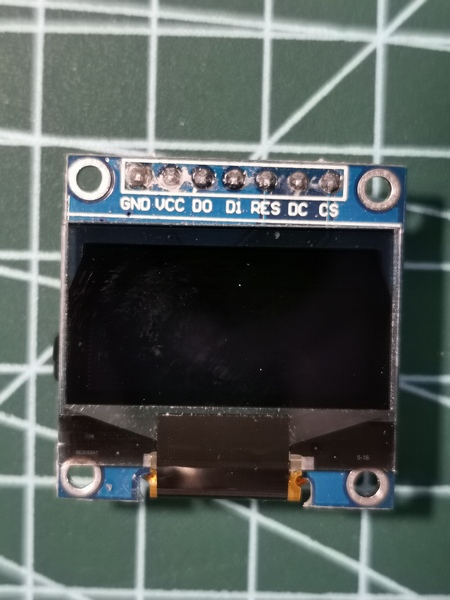
一、oled屏幕 分辨率: 128 * 64
# 针脚
GND ------- 接地
VCC ------- 3.3 ~ 5V
D0  ------- 时钟线
D1  ------- 数据线
RES ------- 复位(低电平有效)
DC  ------- spi 通信 data/command 选择;i2c通信时设置i2c地址
cs  ------- 片选(spi通信,低电平有效)
SPI通信 SPI(Serial Peripheral Interface) 串行外设接口。 以主从方式进行工作,一台master主机可以连接多台slave从机,通过CS片选可以指定选中的从机。通常为4线或3线(单向传输数据)
# 4wire SPI
SCLK ------ 时钟
MOSI ------ Master Out Slave Input
MISO ------ Maset Input Slave Out
CS   ------ 片选
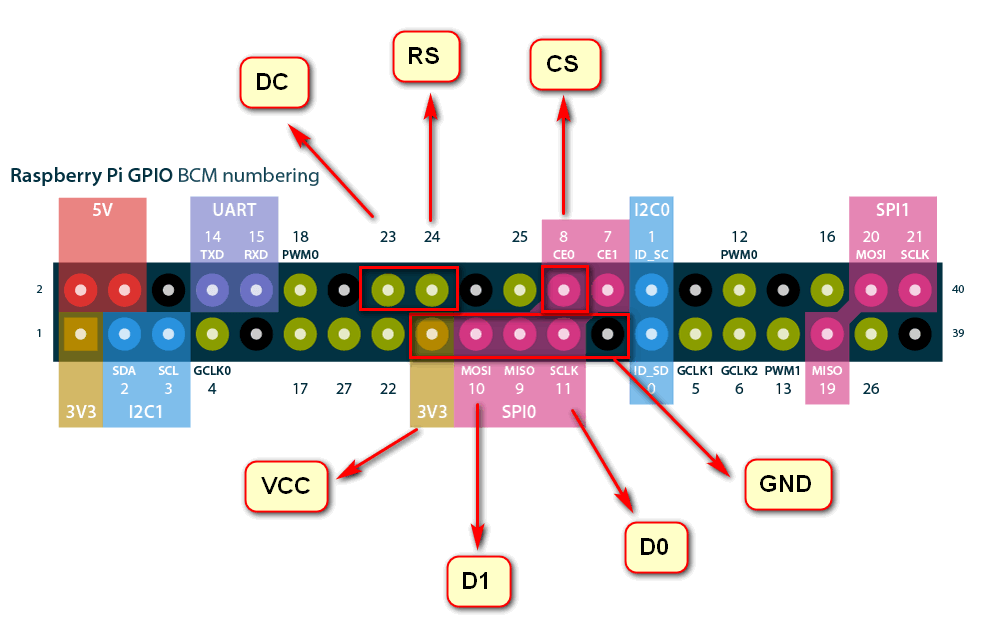
二、连接raspberrypi 1.启用spi
找到advanced options 下的spi,选择启用
2.连接
三、点亮 在github上查找相关ssd1306的相关js驱动,找到一个可用的驱动,为防止丢失,已Fork https://github.com/yancoding/ssd1306-spi
index.js
const rpio = require ("rpio" );class SSD1306 { constructor ({ width, height, resetPin, dcPin, spiChip, rpio } ) { this .EXTERNAL_VCC = 0x1 this .SWITCH_CAP_VCC = 0x2 this .SET_LOW_COLUMN = 0x00 this .SET_HIGH_COLUMN = 0x10 this .SET_MEMORY_MODE = 0x20 this .SET_COL_ADDRESS = 0x21 this .SET_PAGE_ADDRESS = 0x22 this .RIGHT_HORIZ_SCROLL = 0x26 this .LEFT_HORIZ_SCROLL = 0x27 this .VERT_AND_RIGHT_HORIZ_SCROLL = 0x29 this .VERT_AND_LEFT_HORIZ_SCROLL = 0x2A this .DEACTIVATE_SCROLL = 0x2E this .ACTIVATE_SCROLL = 0x2F this .SET_START_LINE = 0x40 this .SET_CONTRAST = 0x81 this .CHARGE_PUMP = 0x8D this .SEG_REMAP = 0xA0 this .SET_VERT_SCROLL_AREA = 0xA3 this .DISPLAY_ALL_ON_RESUME = 0xA4 this .DISPLAY_ALL_ON = 0xA5 this .NORMAL_DISPLAY = 0xA6 this .INVERT_DISPLAY = 0xA7 this .DISPLAY_OFF = 0xAE this .DISPLAY_ON = 0xAF this .COM_SCAN_INC = 0xC0 this .COM_SCAN_DEC = 0xC8 this .SET_DISPLAY_OFFSET = 0xD3 this .SET_COM_PINS = 0xDA this .SET_VCOM_DETECT = 0xDB this .SET_DISPLAY_CLOCK_DIV = 0xD5 this .SET_PRECHARGE = 0xD9 this .SET_MULTIPLEX = 0xA8 this .MEMORY_MODE_HORIZ = 0x00 this .MEMORY_MODE_VERT = 0x01 this .MEMORY_MODE_PAGE = 0x02 let options = { gpiomem : false , mapping : "gpio" , ...rpio }; this ._screenWidth = width; this ._screenHeight = height; this ._resetPin = resetPin; this ._dcPin = dcPin; this ._spiChip = spiChip; this ._rpioOptions = options; this ._screenBuffer = Buffer .alloc ((width * height) / 8 ).fill (0x00 ); } init ( rpio.init (this ._rpioOptions ); rpio.spiBegin (); rpio.spiChipSelect (this ._spiChip ); rpio.spiSetClockDivider (128 ); rpio.open (this ._resetPin , rpio.OUTPUT , rpio.HIGH ); rpio.open (this ._dcPin , rpio.OUTPUT , rpio.LOW ); rpio.msleep (0.01 ); this .reset (); this .command (Buffer .from ([this .DISPLAY_OFF ])); this .command (Buffer .from ([this .SET_DISPLAY_CLOCK_DIV , 0x80 ])); if (this ._screenHeight === 64 ) { this .command (Buffer .from ([this .SET_MULTIPLEX , 0x3F ])); this .command (Buffer .from ([this .SET_COM_PINS , 0x12 ])); } else { this .command (Buffer .from ([this .SET_MULTIPLEX , 0x1F ])); this .command (Buffer .from ([this .SET_COM_PINS , 0x02 ])); } this .command (Buffer .from ([this .SET_DISPLAY_OFFSET , 0x00 ])); this .command (Buffer .from ([this .SET_START_LINE | 0x00 ])); this .command (Buffer .from ([this .CHARGE_PUMP , 0x14 ])); this .command (Buffer .from ([this .SET_MEMORY_MODE , 0x00 ])); this .command (Buffer .from ([this .SEG_REMAP | 0x01 ])); this .command (Buffer .from ([this .COM_SCAN_DEC ])); this .command (Buffer .from ([this .SET_CONTRAST , 0x8f ])); this .command (Buffer .from ([this .SET_PRECHARGE , 0xf1 ])); this .command (Buffer .from ([this .SET_VCOM_DETECT , 0x40 ])); this .command (Buffer .from ([this .DISPLAY_ALL_ON_RESUME ])); this .command (Buffer .from ([this .NORMAL_DISPLAY ])); this .command (Buffer .from ([this .DISPLAY_ON ])); } clearDisplay ( this ._screenBuffer .fill (0 ); } invertDisplay ( this .command (Buffer .from ([this .INVERT_DISPLAY ])); } normalDisplay ( this .command (Buffer .from ([this .NORMAL_DISPLAY ])); } draw ( this .command (Buffer .from ([this .SET_MEMORY_MODE , this .MEMORY_MODE_HORIZ ])); this .command (Buffer .from ([this .SET_PAGE_ADDRESS , 0x00 , 0x07 ])); this .command (Buffer .from ([this .SET_COL_ADDRESS , 0x00 , 0x7f ])); this .command (Buffer .from ([this .DISPLAY_ON ])); this .data (this ._screenBuffer ); } drawPixel (x, y, on ) { if (x < 0 || x > this ._screenWidth - 1 || y < 0 || y > this ._screenHeight - 1 ) { return ; } let page = Math .floor (y / 8 ); let offset = y % 8 ; if (on) { this ._screenBuffer [page * this ._screenWidth + x] |= (0x1 << offset); } else { this ._screenBuffer [page * this ._screenWidth + x] &= ((0x1 << offset) ^ 0xff ); } } reset ( rpio.write (this ._resetPin , rpio.LOW ); rpio.msleep (10 ); rpio.write (this ._resetPin , rpio.HIGH ); } command (buffer ) { rpio.spiWrite (buffer, buffer.length ); } data (buffer ) { rpio.write (this ._dcPin , rpio.HIGH ); rpio.spiWrite (buffer, buffer.length ); rpio.write (this ._dcPin , rpio.LOW ); } end ( rpio.spiEnd (); rpio.close (this ._resetPin , rpio.PIN_RESET ); rpio.close (this ._dcPin , rpio.PIN_RESET ); } } module .exports = SSD1306 ;
使用该驱动
const SSD1306 = require ('ssd1306' )const rpio = require ("rpio" )const ssd1306 = new SSD1306 ({ width : 128 , height : 64 , resetPin : 24 , dcPin : 23 , spiChip : 0 , rpio, }) ssd1306.init () for (let i = 1 ; i < 128 ; i++) { for (let j = 1 ; j < 64 ; j++) { ssd1306.drawPixel (i, j, true ) ssd1306.draw () } }
如果可以依次点亮屏幕上的每一点,说明oled一切正常,可以尝试做些其他的事情了
四、一个像素点是如何点亮的? 其实oled与大多数的点阵屏幕点亮原理都很类似,具体还要看下使用手册
oled 水平共有64个共阴极,那么如果在某一像素点上加上高电平,即可点亮该点
128 * 64 共有64行,128列,64行在数据层分为8页,在第一页,也就是128 * 8的区域,如果在第一列写入的数据为0xff,即二进制的 11111111,则会点亮第一页第一列的8个像素点,上为高位D0,下为低位D7。
所以屏幕的显存为128 * 8 byte,通过ssd1306的指令写入显存,即可显示我们要展示的内容
传统做法是对常用的字符生成不通大小的点阵数据,也就是所谓的字库,生成方式称为字体取模,这种方式有一定的局限性,我们可以考虑采用另一种方式来显示我们想要的任何图形
五、借助canvas绘图 oled屏幕的尺寸是固定的128 * 64尺寸,这点非常类似canvas的画布,我们因此可以将屏幕当成canvas的画布
首先创建一个屏幕大小的画布, 然后借助canvas的api可以绘制出我们想要的图案,再取出画布上的像素数据,转换为相应的数据格式,写入oled的显存,即可在屏幕上展示画布上的图案
注意这里由于屏幕每个点只有两个状态,亮或暗,因此我们在画布上绘制时,只使用黑色绘制即可
const rpio = require ("rpio" );const { createCanvas, loadImage } = require ('canvas' ) class SSD1306 { constructor ({ width, height, resetPin, dcPin, spiChip, rpio } ) { this .EXTERNAL_VCC = 0x1 this .SWITCH_CAP_VCC = 0x2 this .SET_LOW_COLUMN = 0x00 this .SET_HIGH_COLUMN = 0x10 this .SET_MEMORY_MODE = 0x20 this .SET_COL_ADDRESS = 0x21 this .SET_PAGE_ADDRESS = 0x22 this .RIGHT_HORIZ_SCROLL = 0x26 this .LEFT_HORIZ_SCROLL = 0x27 this .VERT_AND_RIGHT_HORIZ_SCROLL = 0x29 this .VERT_AND_LEFT_HORIZ_SCROLL = 0x2A this .DEACTIVATE_SCROLL = 0x2E this .ACTIVATE_SCROLL = 0x2F this .SET_START_LINE = 0x40 this .SET_CONTRAST = 0x81 this .CHARGE_PUMP = 0x8D this .SEG_REMAP = 0xA0 this .SET_VERT_SCROLL_AREA = 0xA3 this .DISPLAY_ALL_ON_RESUME = 0xA4 this .DISPLAY_ALL_ON = 0xA5 this .NORMAL_DISPLAY = 0xA6 this .INVERT_DISPLAY = 0xA7 this .DISPLAY_OFF = 0xAE this .DISPLAY_ON = 0xAF this .COM_SCAN_INC = 0xC0 this .COM_SCAN_DEC = 0xC8 this .SET_DISPLAY_OFFSET = 0xD3 this .SET_COM_PINS = 0xDA this .SET_VCOM_DETECT = 0xDB this .SET_DISPLAY_CLOCK_DIV = 0xD5 this .SET_PRECHARGE = 0xD9 this .SET_MULTIPLEX = 0xA8 this .MEMORY_MODE_HORIZ = 0x00 this .MEMORY_MODE_VERT = 0x01 this .MEMORY_MODE_PAGE = 0x02 let options = { gpiomem : false , mapping : "gpio" , ...rpio }; this ._screenWidth = width; this ._screenHeight = height; this ._resetPin = resetPin; this ._dcPin = dcPin; this ._spiChip = spiChip; this ._rpioOptions = options; this ._screenBuffer = Buffer .alloc ((width * height) / 8 ).fill (0x00 ); this ._ctx = createCanvas (128 , 64 ).getContext ('2d' ) } init ( this ._ctx .fillStyle = 'rgba(255, 255, 255, 1)' this ._ctx .fillRect (0 , 0 , 128 , 64 ) rpio.init (this ._rpioOptions ); rpio.spiBegin (); rpio.spiChipSelect (this ._spiChip ); rpio.spiSetClockDivider (128 ); rpio.open (this ._resetPin , rpio.OUTPUT , rpio.HIGH ); rpio.open (this ._dcPin , rpio.OUTPUT , rpio.LOW ); rpio.msleep (0.01 ); this .reset (); this .command (Buffer .from ([this .DISPLAY_OFF ])); this .command (Buffer .from ([this .SET_DISPLAY_CLOCK_DIV , 0x80 ])); if (this ._screenHeight === 64 ) { this .command (Buffer .from ([this .SET_MULTIPLEX , 0x3F ])); this .command (Buffer .from ([this .SET_COM_PINS , 0x12 ])); } else { this .command (Buffer .from ([this .SET_MULTIPLEX , 0x1F ])); this .command (Buffer .from ([this .SET_COM_PINS , 0x02 ])); } this .command (Buffer .from ([this .SET_DISPLAY_OFFSET , 0x00 ])); this .command (Buffer .from ([this .SET_START_LINE | 0x00 ])); this .command (Buffer .from ([this .CHARGE_PUMP , 0x14 ])); this .command (Buffer .from ([this .SET_MEMORY_MODE , 0x00 ])); this .command (Buffer .from ([this .SEG_REMAP | 0x01 ])); this .command (Buffer .from ([this .COM_SCAN_DEC ])); this .command (Buffer .from ([this .SET_CONTRAST , 0x8f ])); this .command (Buffer .from ([this .SET_PRECHARGE , 0xf1 ])); this .command (Buffer .from ([this .SET_VCOM_DETECT , 0x40 ])); this .command (Buffer .from ([this .DISPLAY_ALL_ON_RESUME ])); this .command (Buffer .from ([this .NORMAL_DISPLAY ])); this .command (Buffer .from ([this .DISPLAY_ON ])); } getContext (contextID ) { if (contextID === '2d' ) { return this ._ctx } else { throw new Error ('getConText(contextID)参数错误' ) } } clearDisplay ( this ._screenBuffer .fill (0 ); } invertDisplay ( this .command (Buffer .from ([this .INVERT_DISPLAY ])); } normalDisplay ( this .command (Buffer .from ([this .NORMAL_DISPLAY ])); } draw ( this .command (Buffer .from ([this .SET_MEMORY_MODE , this .MEMORY_MODE_HORIZ ])); this .command (Buffer .from ([this .SET_PAGE_ADDRESS , 0x00 , 0x07 ])); this .command (Buffer .from ([this .SET_COL_ADDRESS , 0x00 , 0x7f ])); this .command (Buffer .from ([this .DISPLAY_ON ])); this .data (this ._screenBuffer ); } drawPixel (x, y, on ) { if (x < 0 || x > this ._screenWidth - 1 || y < 0 || y > this ._screenHeight - 1 ) { return ; } let page = Math .floor (y / 8 ); let offset = y % 8 ; if (on) { this ._screenBuffer [page * this ._screenWidth + x] |= (0x1 << offset); } else { this ._screenBuffer [page * this ._screenWidth + x] &= ((0x1 << offset) ^ 0xff ); } } reset ( rpio.write (this ._resetPin , rpio.LOW ); rpio.msleep (10 ); rpio.write (this ._resetPin , rpio.HIGH ); } command (buffer ) { rpio.spiWrite (buffer, buffer.length ); } data (buffer ) { rpio.write (this ._dcPin , rpio.HIGH ); rpio.spiWrite (buffer, buffer.length ); rpio.write (this ._dcPin , rpio.LOW ); } end ( rpio.spiEnd (); rpio.close (this ._resetPin , rpio.PIN_RESET ); rpio.close (this ._dcPin , rpio.PIN_RESET ); } scroll ( this .command (Buffer .from ([this .RIGHT_HORIZ_SCROLL ])); this .command (Buffer .from ([this .ACTIVATE_SCROLL ])); this .data (this ._screenBuffer ); } drawToDisplay ( let pixelArray = [] for (let page = 0 ; page < 8 ; page++) { for (let col = 0 ; col < 128 ; col++) { const imageData = this ._ctx .getImageData (col, page * 8 , 1 , 8 ) let byte = 0x00 for (let i = 0 , j = 0 ; i < imageData.data .length ; i += 4 , j++) { const r = imageData.data [i] const g = imageData.data [i + 1 ] const b = imageData.data [i + 2 ] const a = imageData.data [i + 3 ] const average = 0.21 * r + 0.72 * g + 0.07 * b const bit = average < 128 ? 1 : 0 byte += bit << j } pixelArray.push (byte) } } this ._screenBuffer = Buffer .from (pixelArray) this .draw () } } module .exports = SSD1306 ;
尝试绘制文字
// 引入
const SSD1306 = require('ssd1306')
const rpio = require("rpio")

// 创建实例
const ssd1306 = new SSD1306({
  width: 128,
  height: 64,
  resetPin: 24,
  dcPin: 23,
  spiChip: 0,
  rpio,
})

// 初始化
ssd1306.init()

// 获取canvas 2d 上下文
const ctx = ssd1306.getContext('2d')

ctx.strokeStyle = '#000'
ctx.strokeRect(0, 0, 128, 64)

ctx.font = '18px arial'
ctx.fillStyle = 'rgba(0, 0, 0, 1)'
ctx.textAlign = 'center'
ctx.fillText(`Hello World`, 64, 32)
ssd1306.drawToDisplay()